Vscode准备工作
官方文档:https://code.visualstudio.com/docs/cpp/config-mingw
参考:
- 在vscode运行c++:https://blog.csdn.net/weixin_62411288/article/details/130796591
- 在vscode用makefile运行opengl:https://blog.csdn.net/weixin_43952192/article/details/122877840
- VSCode-Clang-MinGW-OpenGl配置教程:https://apollomao.com/VSCode-Clang-MinGW-OpenGl%E9%85%8D%E7%BD%AE%E6%95%99%E7%A8%8B/
- vscode中文乱码解决:https://blog.csdn.net/weixin_51723388/article/details/124171357
vscode安装c++扩展;

g++的话推荐是安装 MSYS2;MSVC的话需要安装 visual studio。
安装完打开
MSYS2 UCRT64,安装mingw-w64-ucrt-x86_64-gcc和mingw-w64-x86_64-toolchain:1
2pacman -S mingw-w64-ucrt-x86_64-gcc
pacman -S --needed base-devel mingw-w64-x86_64-toolchain给
D:\msys64\mingw64\bin配置系统环境变量,重启电脑后在cmd上输入检查是否安装成功:1
2
3gcc --version
g++ --version
gdb --version如果配置MSVC,需要给
D:\Program Files\Microsoft Visual Studio\2022\Professional\VC\Tools\MSVC\14.38.33130\bin\Hostx64\x64配置环境变量,其中Hostx64表示软件编译时使用的处理器架构,即 x64 架构。第二个x64表示目标平台的处理器架构,即编译生成的可执行文件将在 x64 架构的处理器上运行,重启电脑后在cmd上输入检查是否安装成功:1
cl -V
Vscode && g++
官方文档:https://code.visualstudio.com/docs/cpp/config-mingw
以learnOpenGL源码为例,需要配置的有glfw、glad等库。
准备工作
需要用cmake-gui进行 Configure 和 Generate 生成 root_directory.h,随后需要 Include 到目录中。

生成的root_directory.h 在 abs_path/build_vs2022/configuration/ 中。
这个代码运行的过程中会遇到 undefined reference to ‘stbi_load’ 的问题,需要在代码 #include <stb_image.h> 后加入 STB_IMAGE_IMPLEMENTATION 宏的定义。
1 |
配置编译器(c_cpp_properties.json)
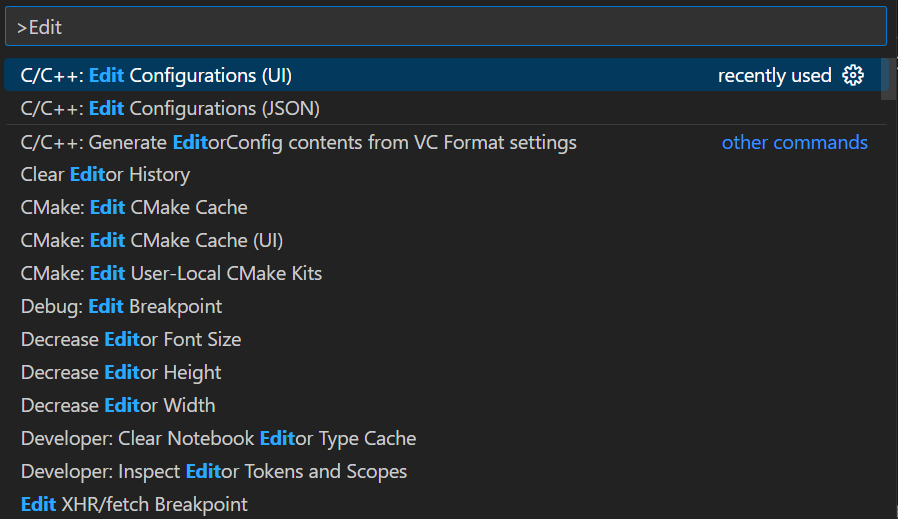
在vscode中输入 ctrl+shift+p 调出命令行,输入选择 C/C++: Edit Configurations (UI):
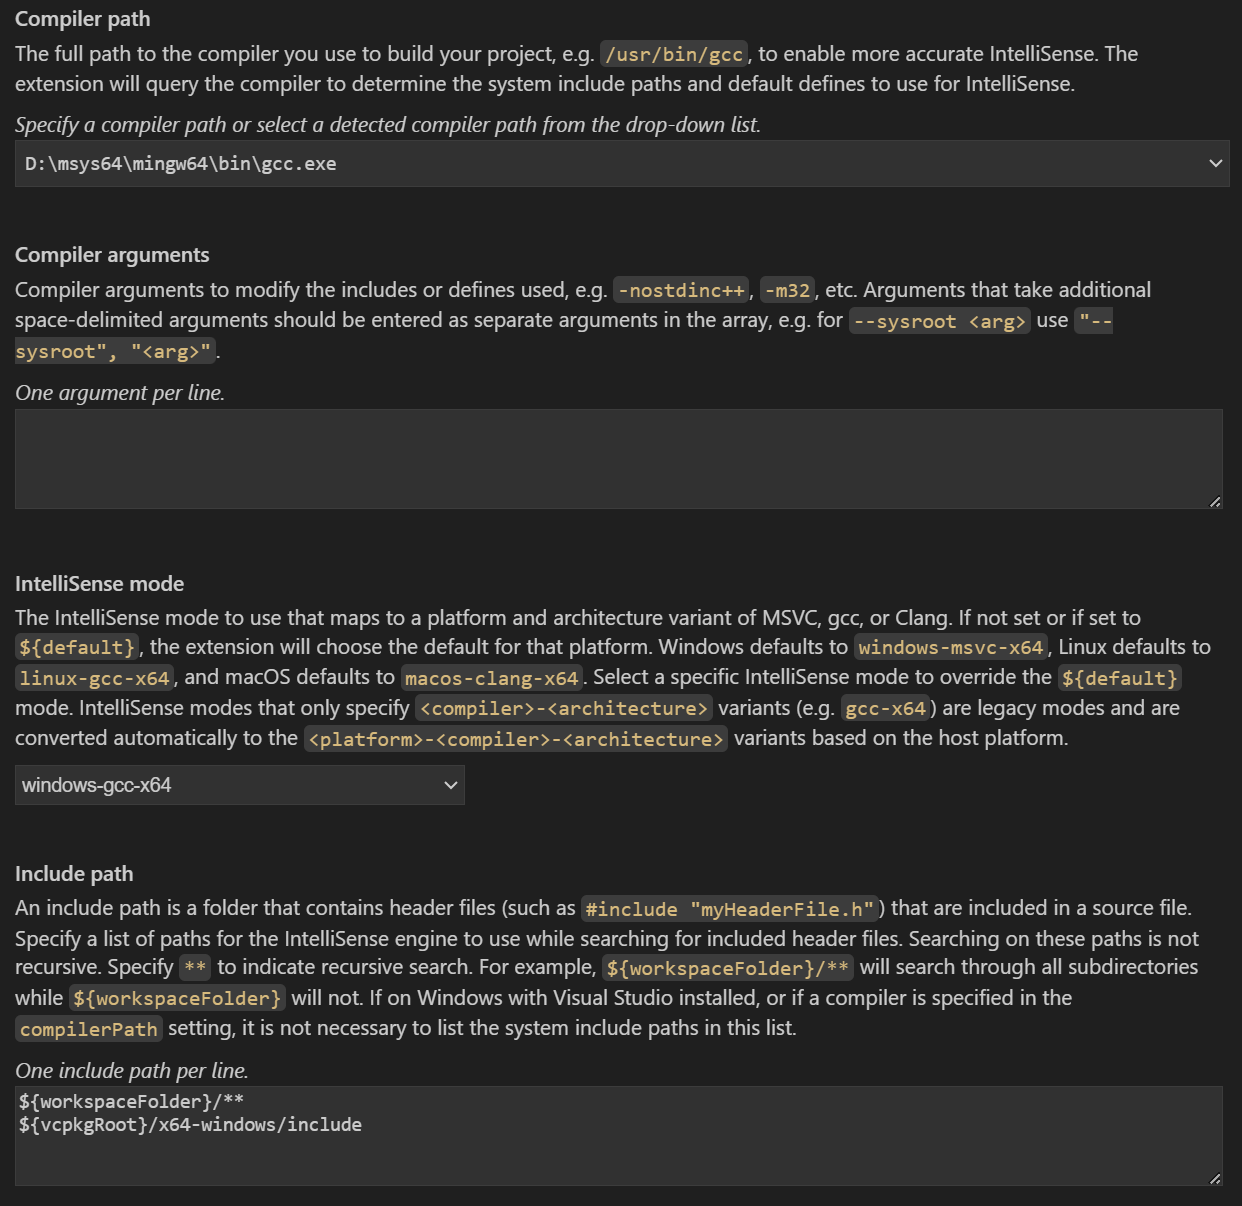
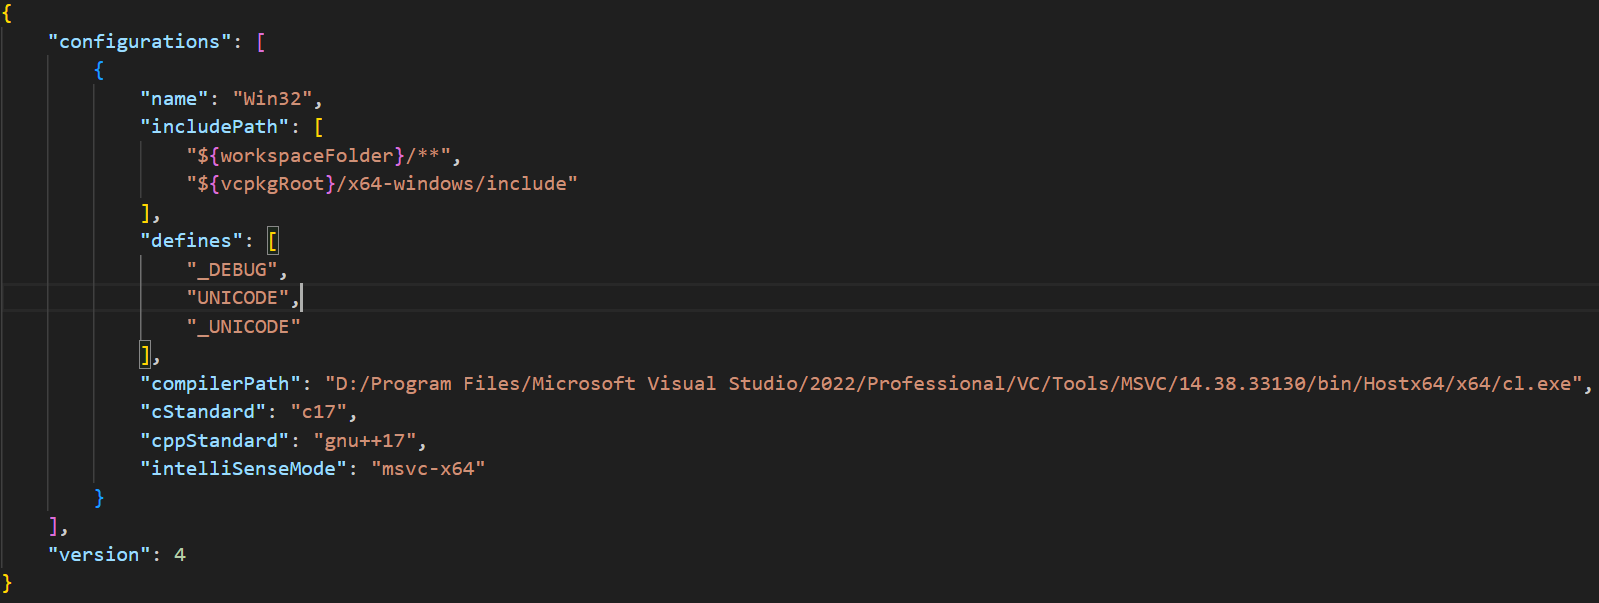
这个操作会在 .vscode 的文件夹中创建 c_cpp_properties.json 文件,其中需要设置的是 Include Path、 Compiler Path 和 IntelliSense Mode
其中:
Compiler Path是使用的编译器,这里选择gcc.exe。IntelliSense Mode选择和编译器、运行平台对应的,这里选择windows-gcc-x64。Include Path是下述 xxx 文件中的 includepath 的搜索范围:
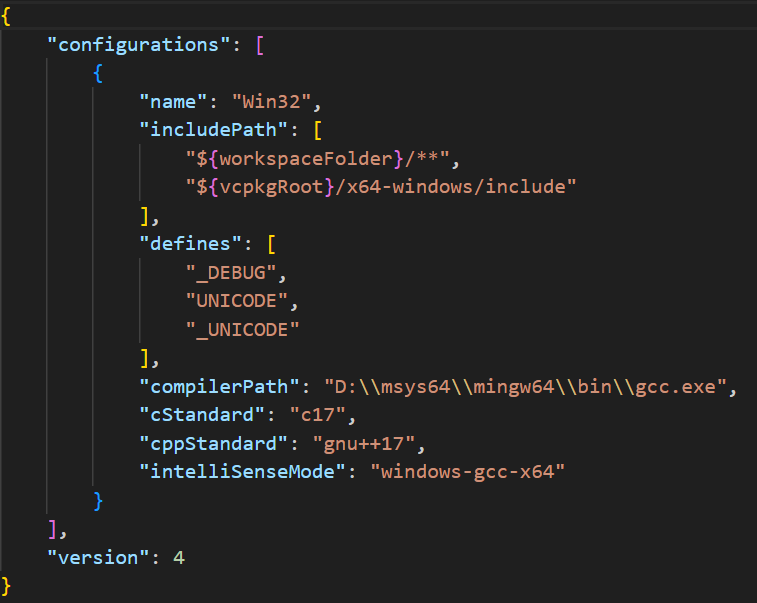
这等价于在 c_cpp_properties.json 进行相应的编辑:
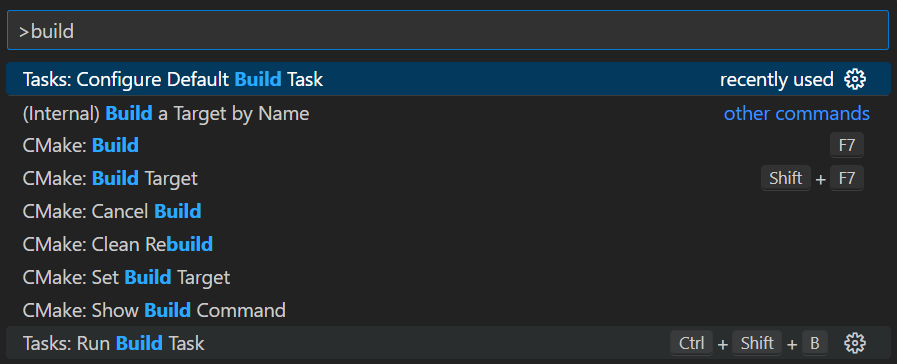
配置构建任务(tasks.json)
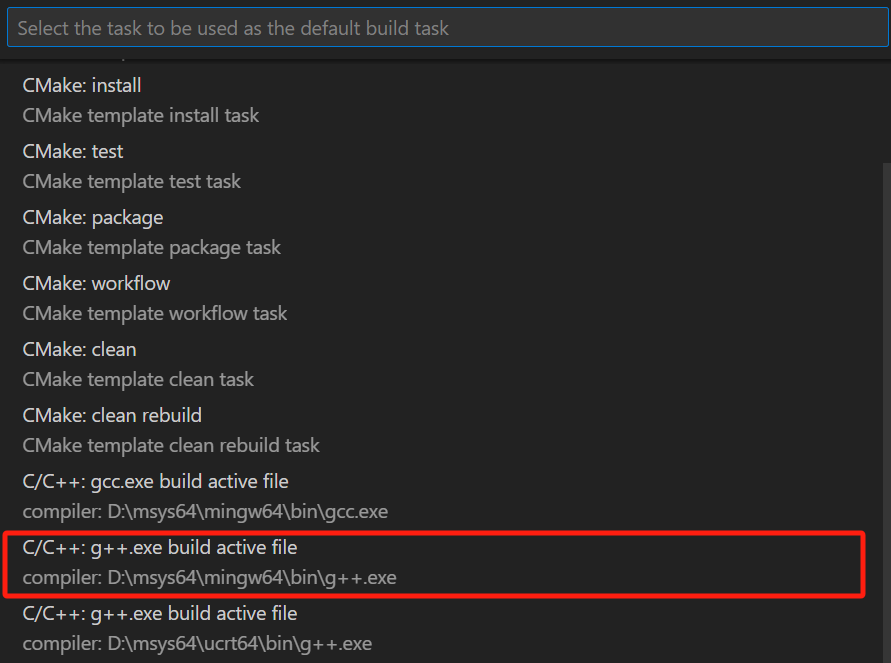
在vscode中输入 ctrl+shift+p 调出命令行,输入选择 Tasks:Configure Default Build Task:
再选择 C/C++: g++.exe build active file:
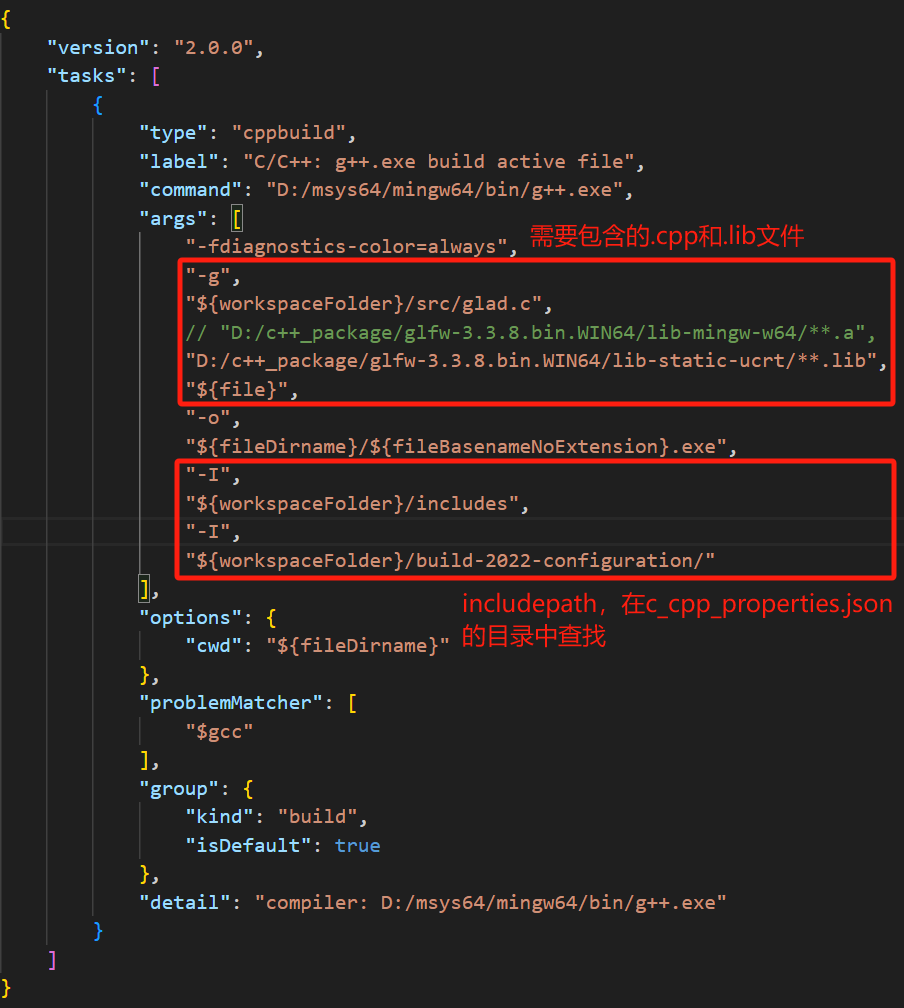
这个操作会在 .vscode 的文件夹中创建 tasks.json 文件:
其中,一些配置说明如下:
1 | { |
在这个demo中,配置如下:
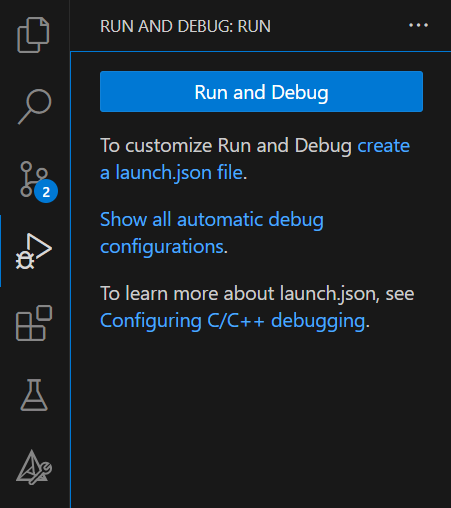
配置调试设置(launch.json)
菜单栏点击 run and debug,或者直接用 F5:
选择 C++(GDB/LLDB):

这个操作会在 .vscode 的文件夹中创建 launch.json 文件:
其相关配置说明如下:
1 | { |
Vscode && MSVC
官方文档:https://code.visualstudio.com/docs/cpp/config-msvc
以learnOpenGL源码为例,需要配置的有glfw、glad等库。
准备工作
准备工作基本同上。
需要用cmake-gui进行 Configure 和 Generate 生成 root_directory.h,随后需要 Include 到目录中。
生成的root_directory.h 在 abs_path/build_vs2022/configuration/ 中。
这个代码运行的过程中会遇到 undefined reference to ‘stbi_load’ 的问题,需要在代码 #include <stb_image.h> 后加入 STB_IMAGE_IMPLEMENTATION 宏的定义。
1 |
配置编译器(c_cpp_properties.json)
在vscode中输入 ctrl+shift+p 调出命令行,输入选择 C/C++: Edit Configurations (UI):
这个操作会在 .vscode 的文件夹中创建 c_cpp_properties.json 文件,其中需要设置的是 Include Path、 Compiler Path 和 IntelliSense Mode
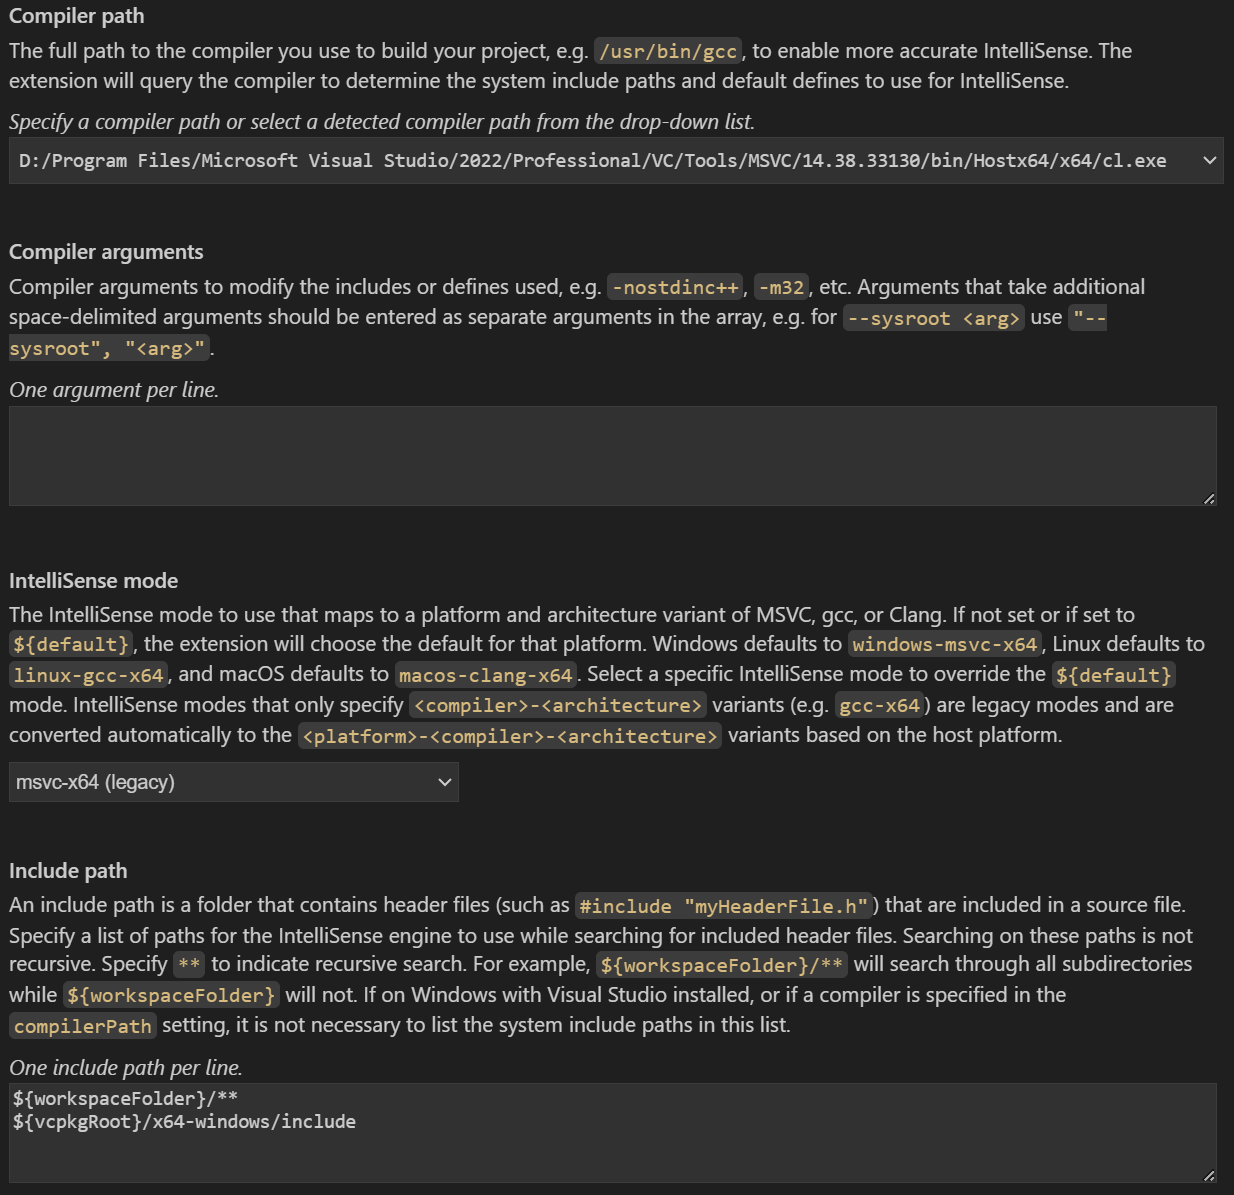
其中:
Compiler Path是使用的编译器,这里选择cl.exe。IntelliSense Mode选择和编译器、运行平台对应的,这里选择msvc-x64(legacy)。Include Path是下述 xxx 文件中的 includepath 的搜索范围:
这等价于在 c_cpp_properties.json 进行相应的编辑:
配置构建任务(tasks.json)
使用Develop Command Prompt启动
启动Develop Command Prompt,输入where cl可以得到cl.exe的位置:
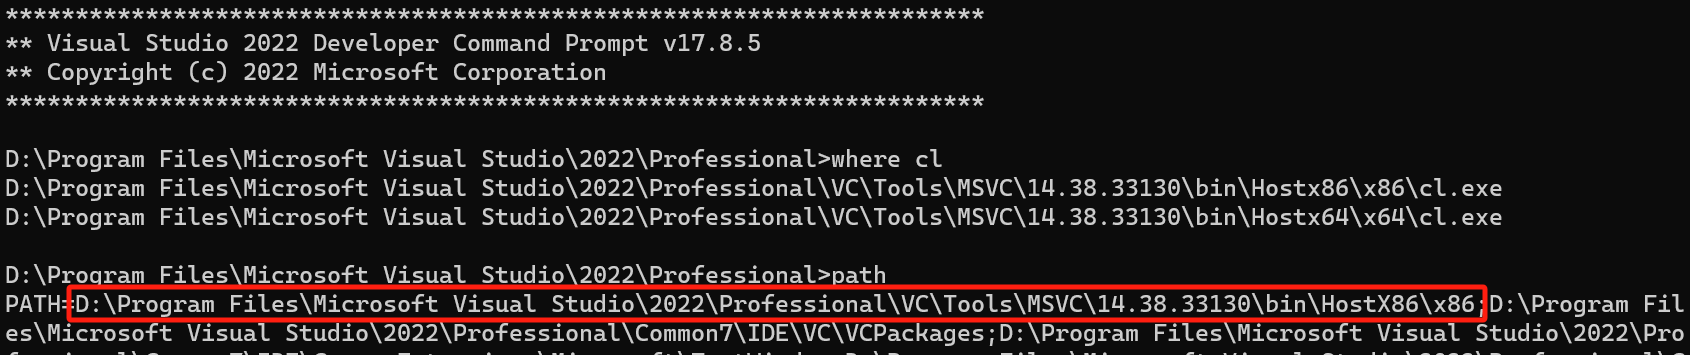
可以看到默认是使用x86,通过命令set path=D:\Program Files\Microsoft Visual Studio\2022\Professional\VC\Tools\MSVC\14.38.33130\bin\Hostx64\x64;%path%修改环境变量可以修改为使用 x64:

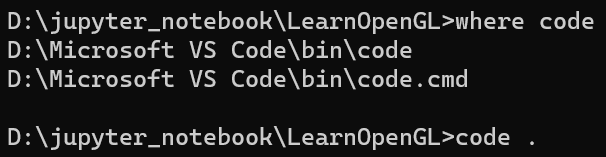
命令行修改目录到vscode工作目录:
使用code .使用vscode打开当前工作目录,如果code命令找不到,则需要配置vscode中bin目录添加到系统环境变量中。
tasks.json配置如下,简单来说就是缺啥找啥,这里使用everything进行对报错缺失的文件进行快速搜索:
1 | "tasks": [ |
其参数分为编译和连接两个阶段。
其中:
"/Zi":生成调试信息。"/EHsc":启用 C++ 异常处理。"/Fe:":指定输出文件的名称和路径。${fileDirname}\\${fileBasenameNoExtension}.exe":输出文件的路径和名称,基于当前打开的文件。${file}:当前打开的文件的路径和名称。${workspaceFolder}/src/glad.c":引入glad.c文件。"/I":指定包含文件的路径。${workspaceFolder}/includes":包含文件的路径。${workspaceFolder}/build_vs2022/configuration/":配置文件的路径。"/link":链接阶段的参数。"MACHINE:x64":指定目标机器架构为 64 位。"LIBPATH:${workspaceFolder}/lib":指定库文件的路径。"glfw3.lib":链接到glfw3.lib库。${workspaceFolder}/build_vs2022/Debug/STB_IMAGE.lib":链接到STB_IMAGE.lib库。${workspaceFolder}/build_vs2022/Debug/GLAD.lib":链接到GLAD.lib库。
使用vscode直接启动(还没验证)
需要加上"windows" 部分,可从官网上复制:https://code.visualstudio.com/docs/cpp/config-msvc
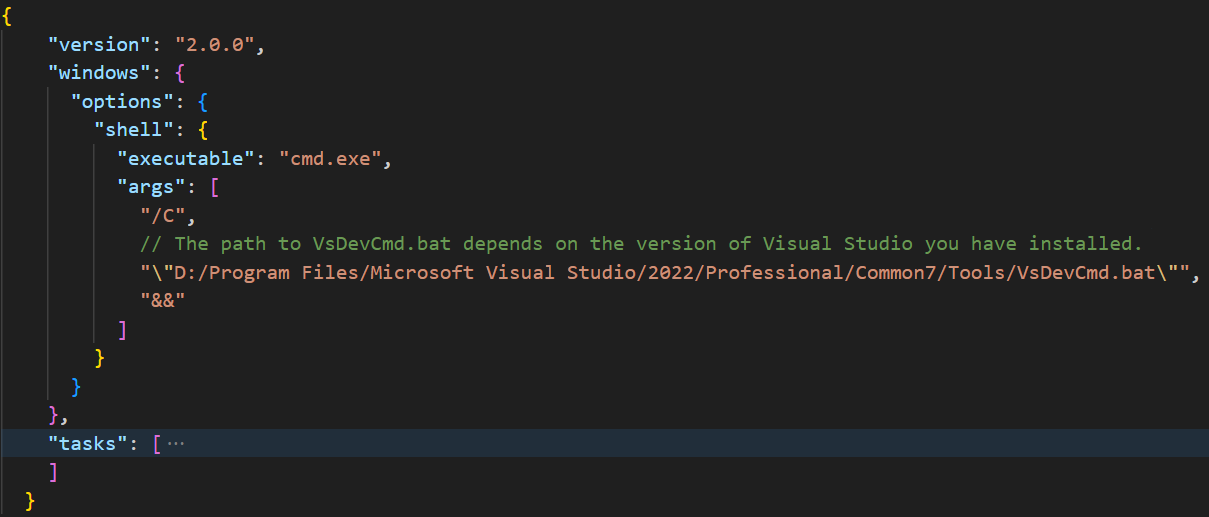
这里的:"\"D:/Program Files/Microsoft Visual Studio/2022/Professional/Common7/Tools/VsDevCmd.bat\"":这是要运行的批处理文件的路径。在这里,VsDevCmd.bat 是 Visual Studio 的开发者命令提示符批处理文件。它设置了一些环境变量和路径,以便在命令行中使用 Visual Studio 的工具和编译器。
Visual Studio
环境设置。用一个油管up主thecherno的环境设置:http://thecherno.com/vs
在Visual Studio中,使用工具->导入导出设置:
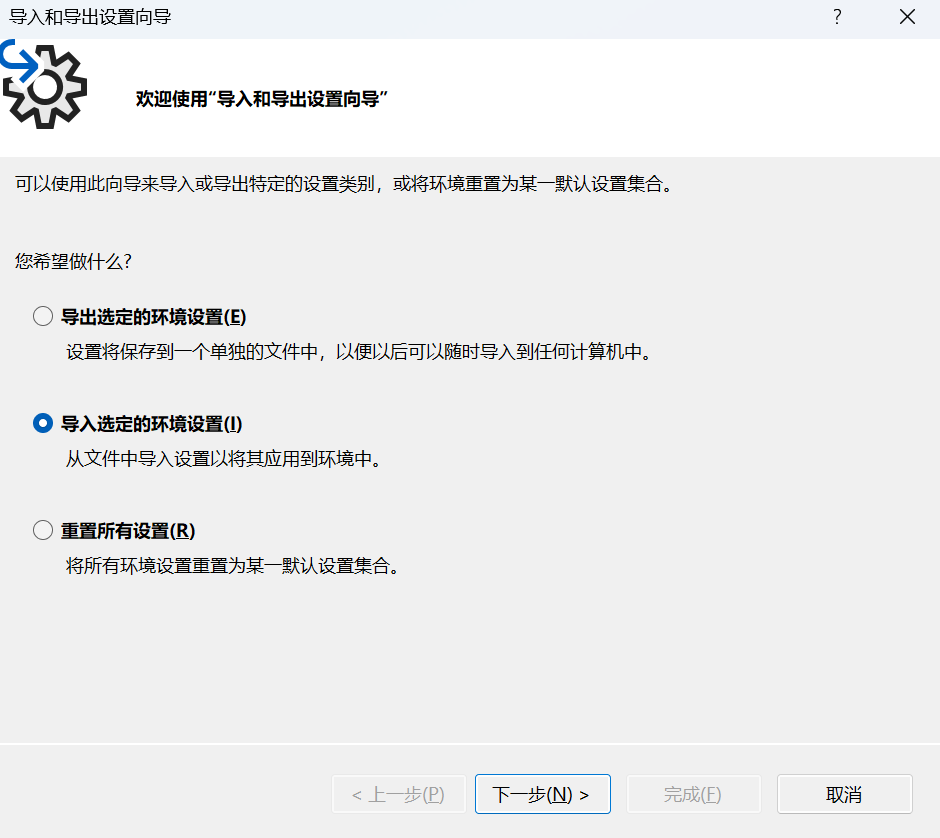
一直点下一步,在这个界面通过预览来找到需要加载的环境配置文件:

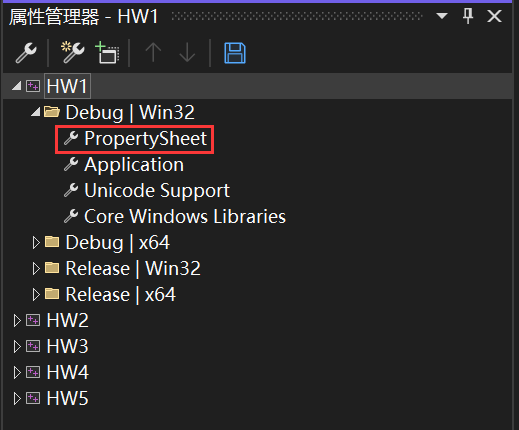
属性管理器。使用属性管理器复用项目配置的时候,创建了 PropertySheet.prop 文件需要点击到项目的里面的PropertySheet才能打开图形窗口编辑,直接双击 PropertySheet.prop 是以文本编辑的形式打开。
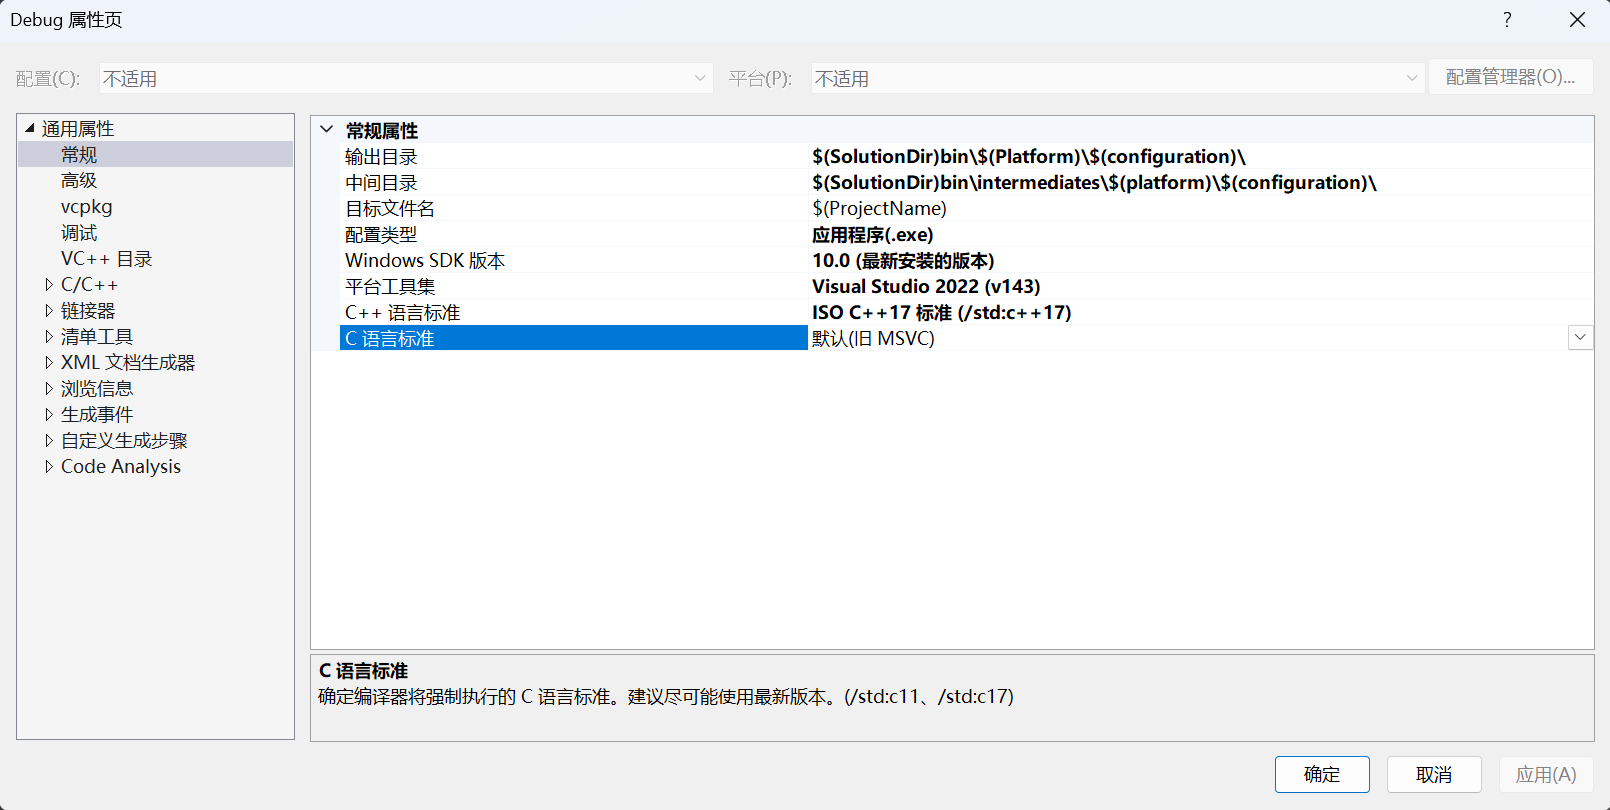
输出路径,可以将输出目录和中间目录(主要包括 .obj、 .pdb 文件等)修改到 bin 下。
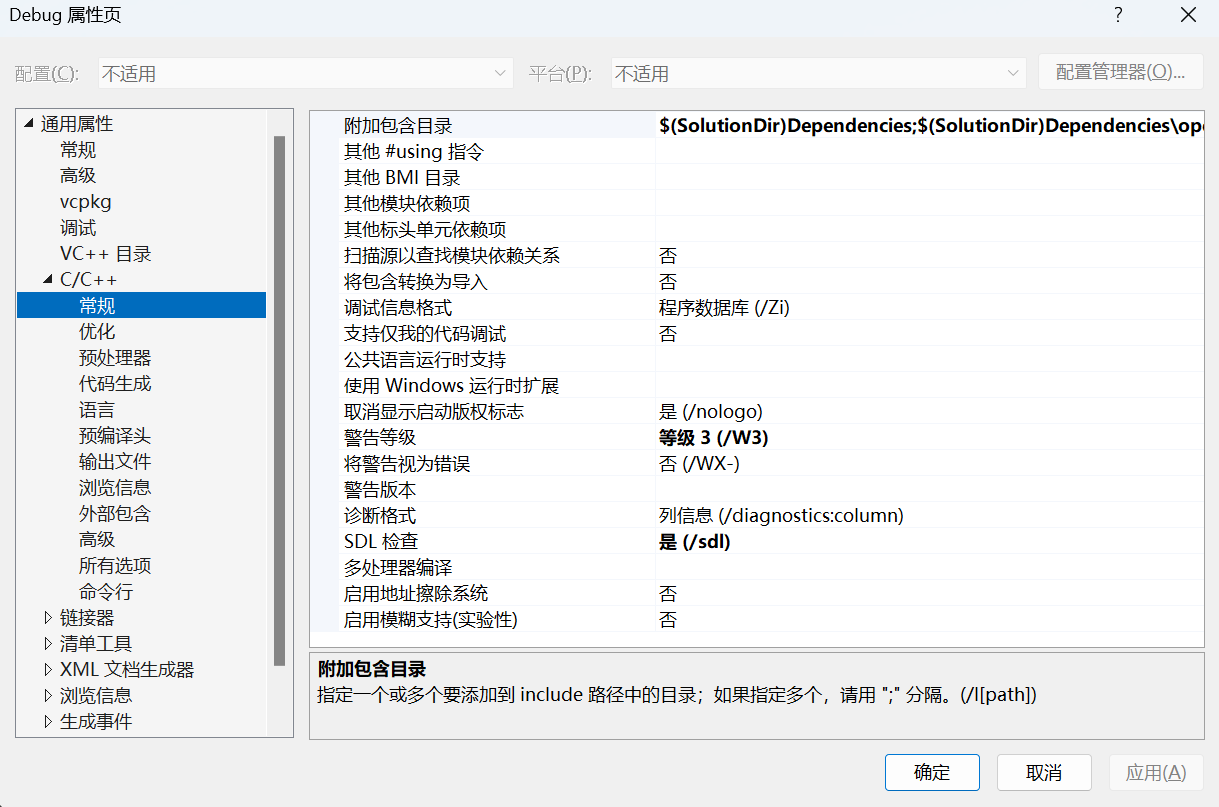
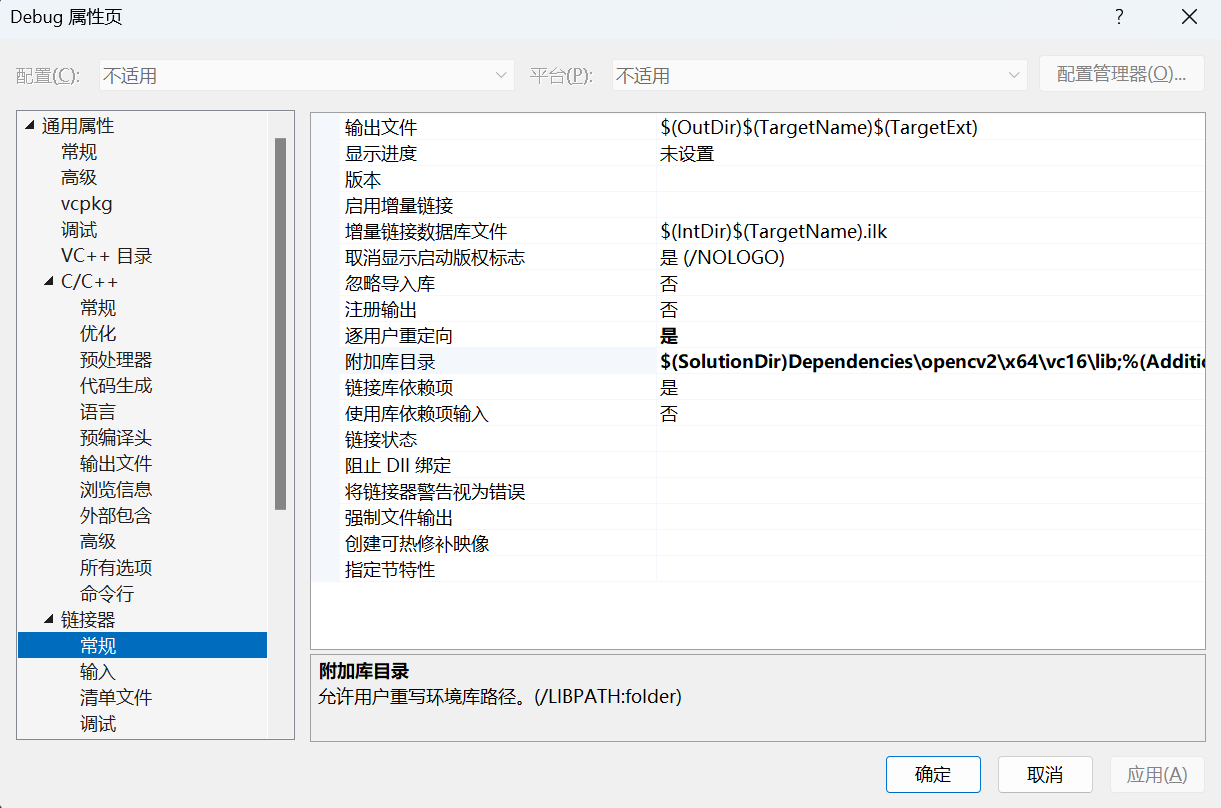
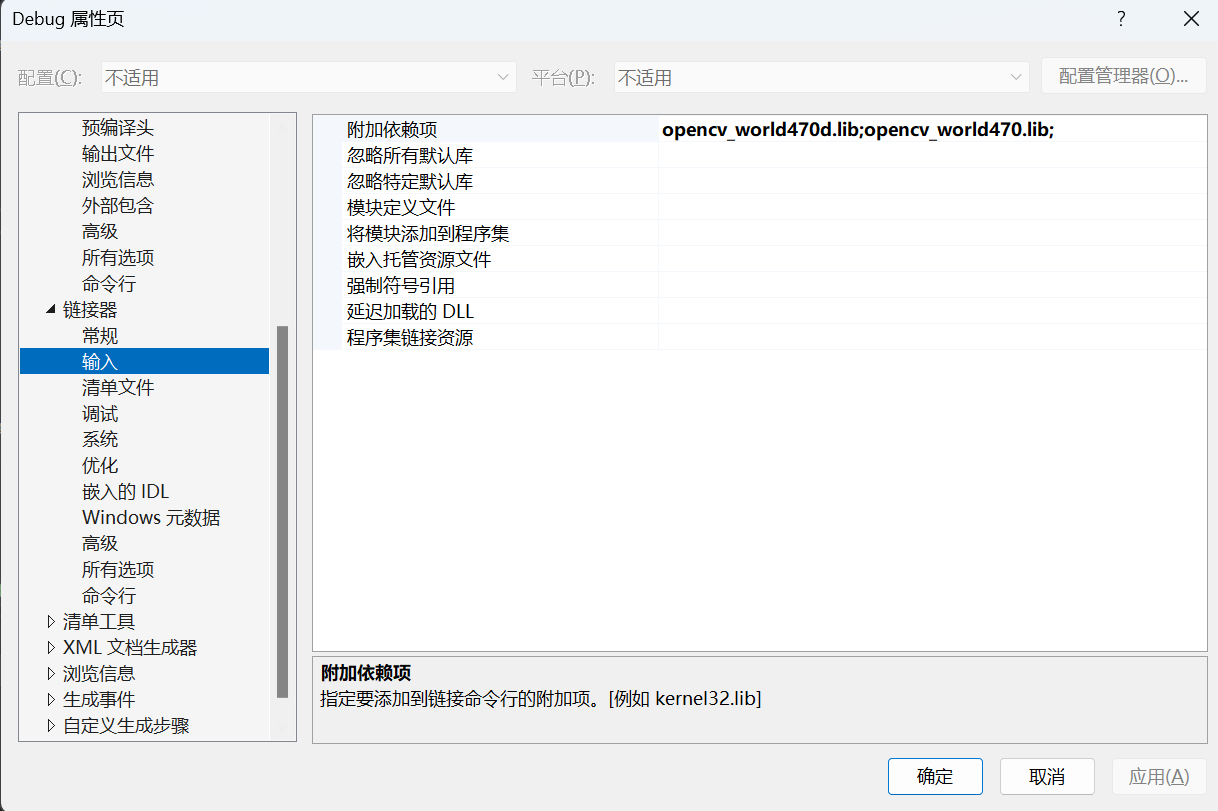
附加包含目录和附加库目录中尽量使用宏来设定。
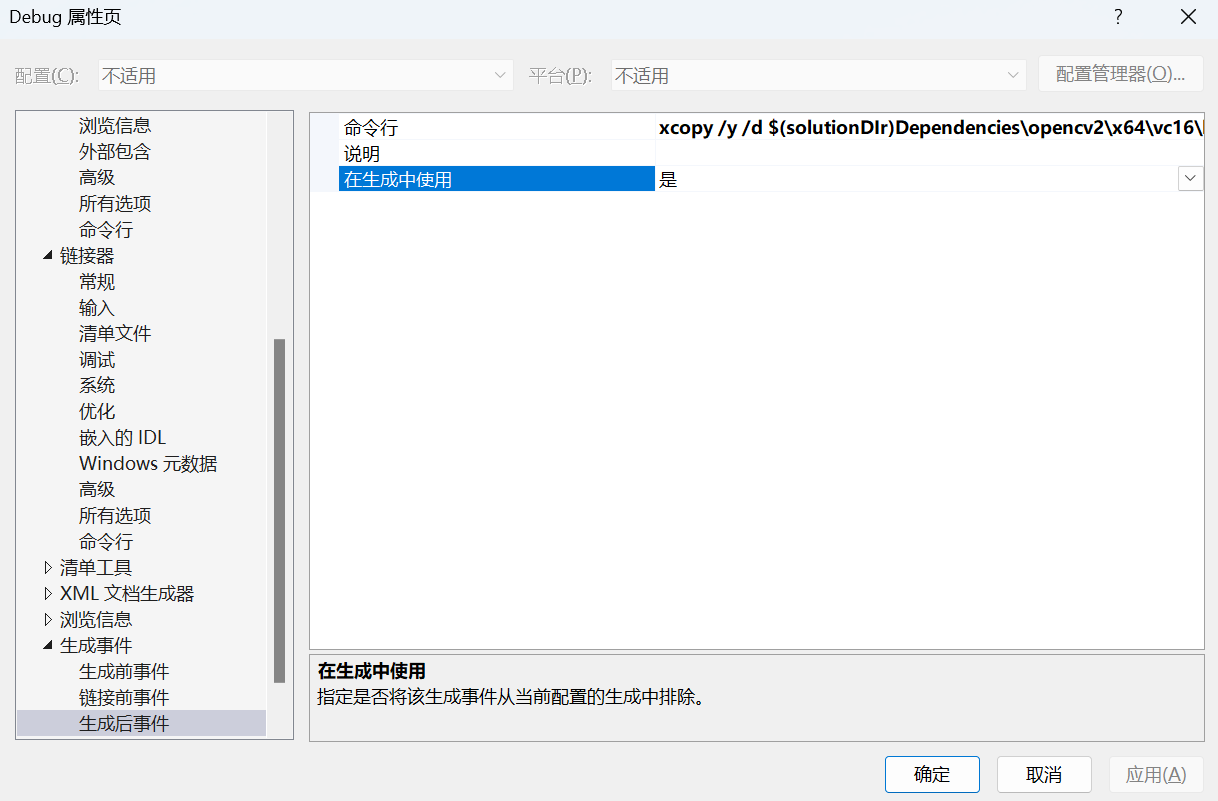
生成事件可用于拷贝 .dll 到 .exe 所在目录: